Fibonacci Lemonade

How would one make mathematical cuisine? Not just food that looks mathematical (like math cookies), but something that you truly have to eat and taste in order to experience its mathematical nature.

Henry Segerman proposed this question, and today we had our first experience tasting the answer. A masterpiece of mathematical art, the answer I came up with is simple enough that anyone can make it at home, surprisingly visually beautiful, delicious…
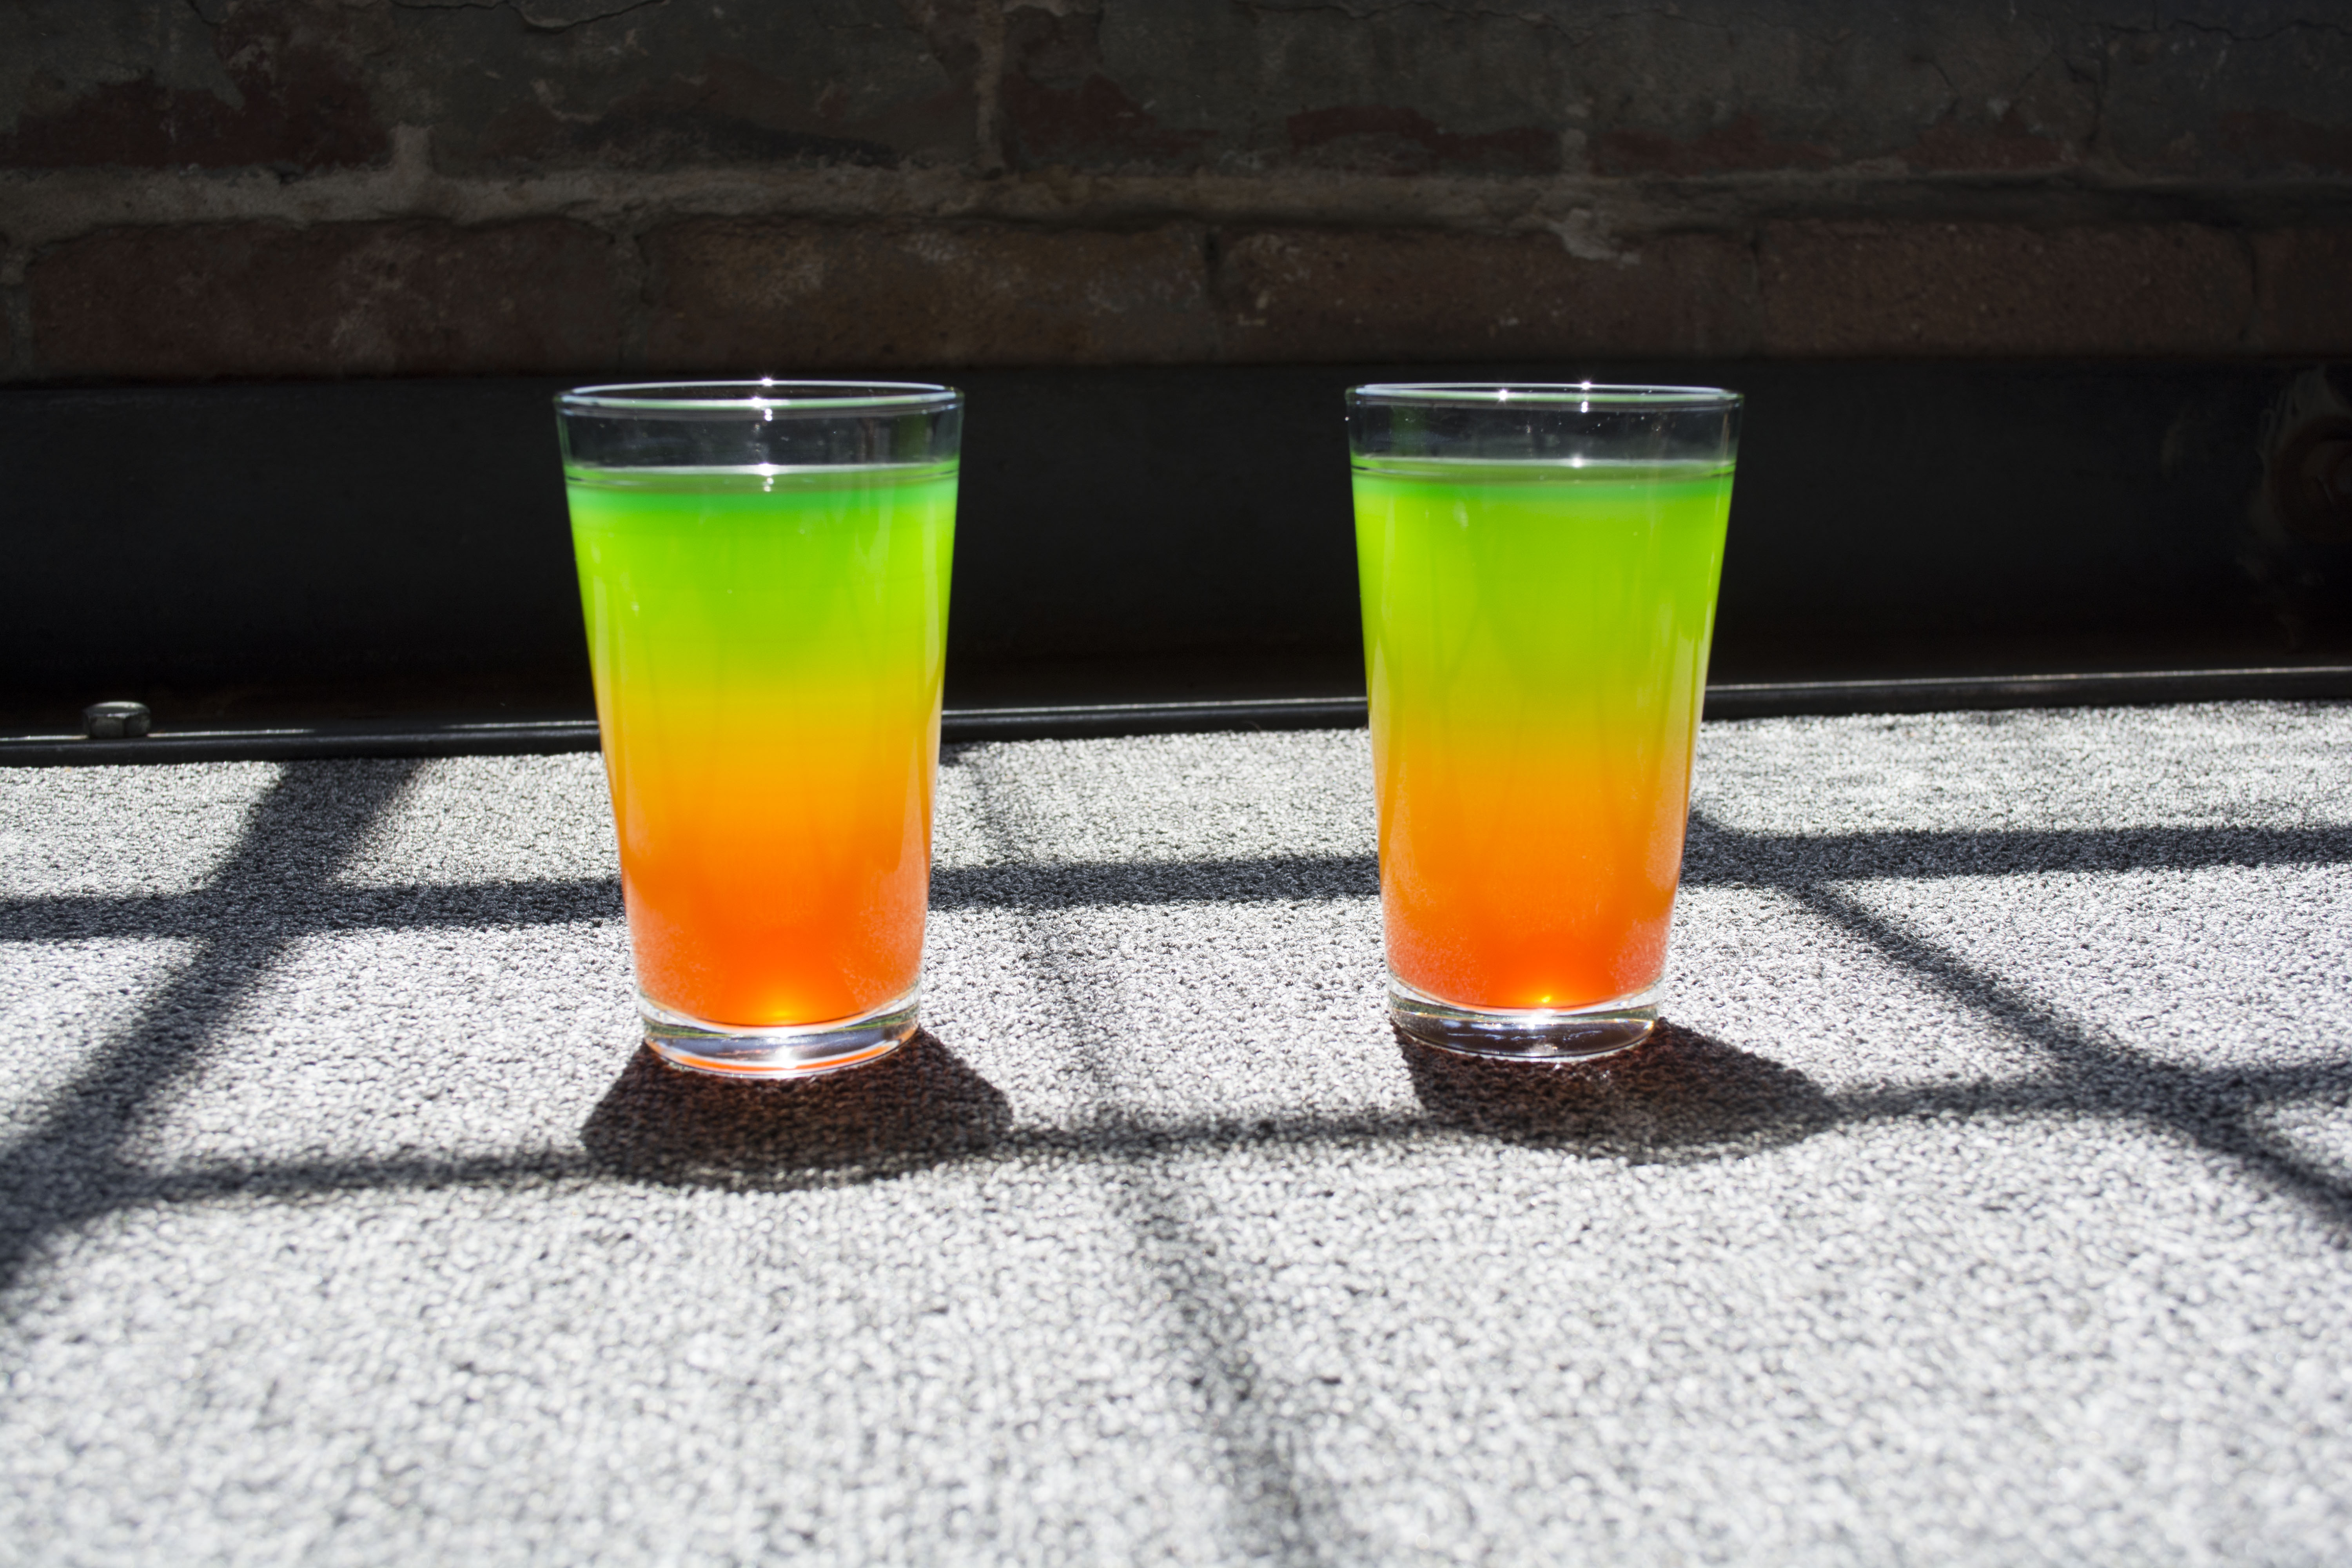
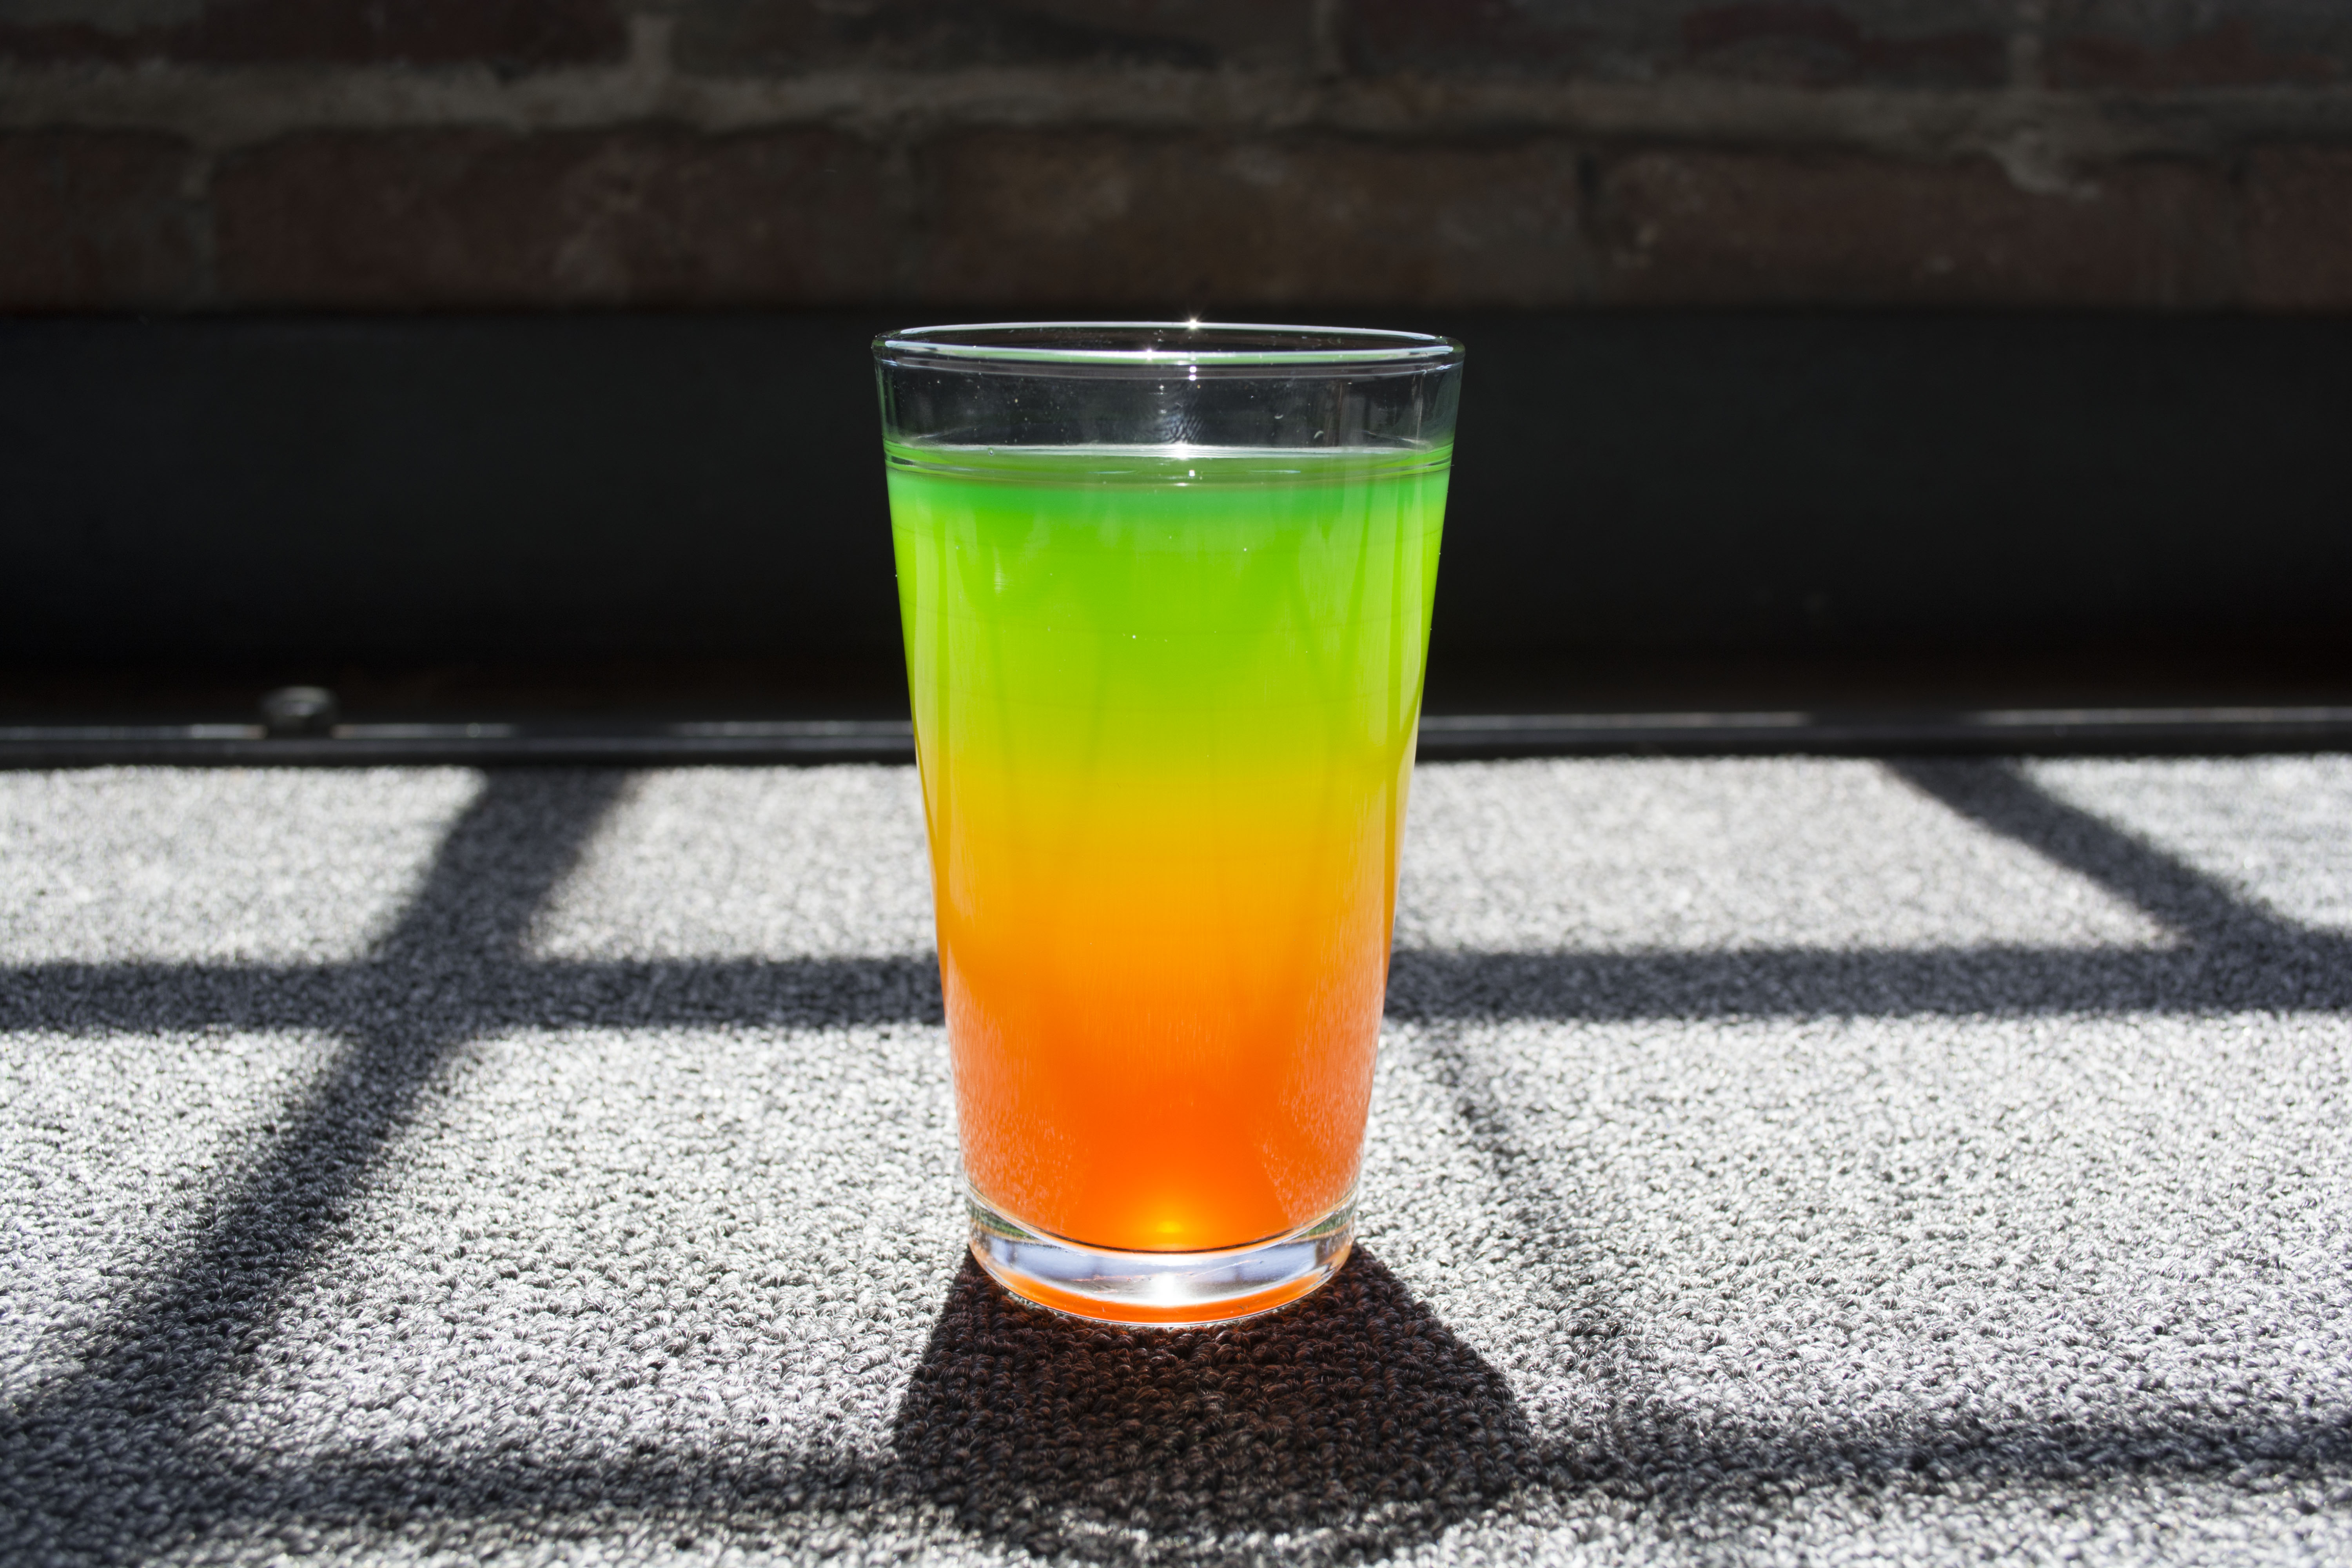
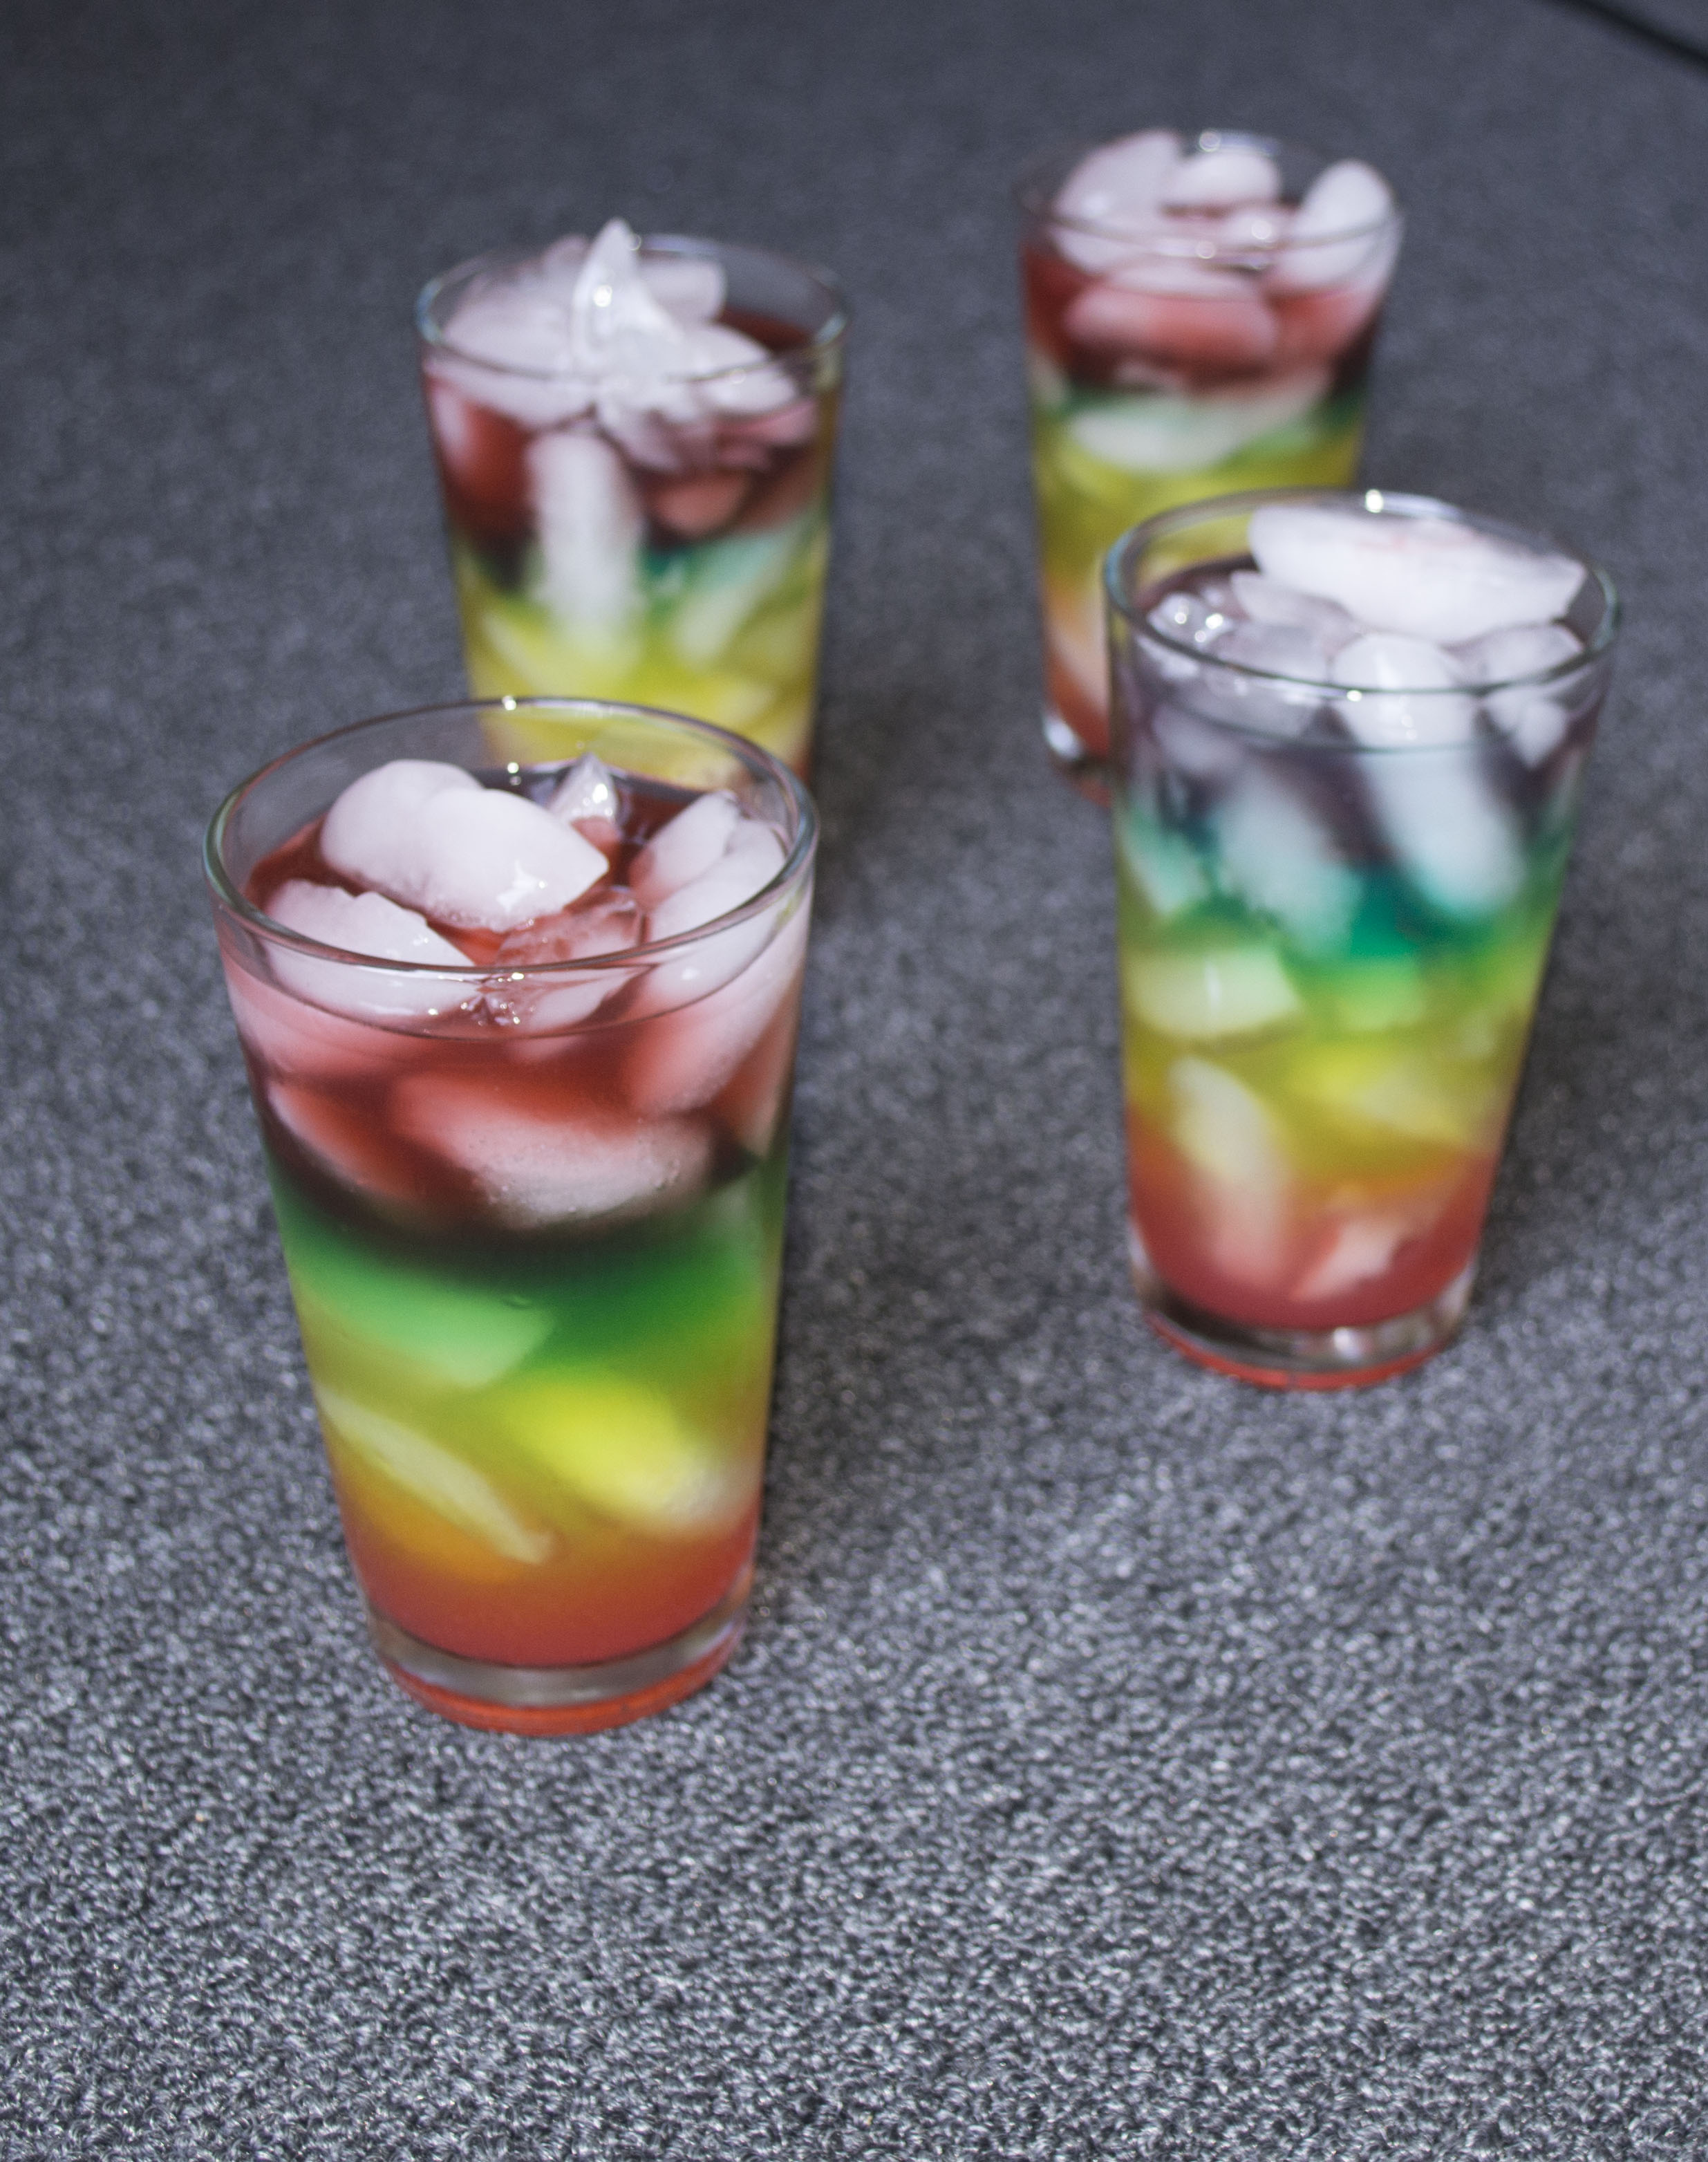
Layered Drinks!

fibDrinkIce

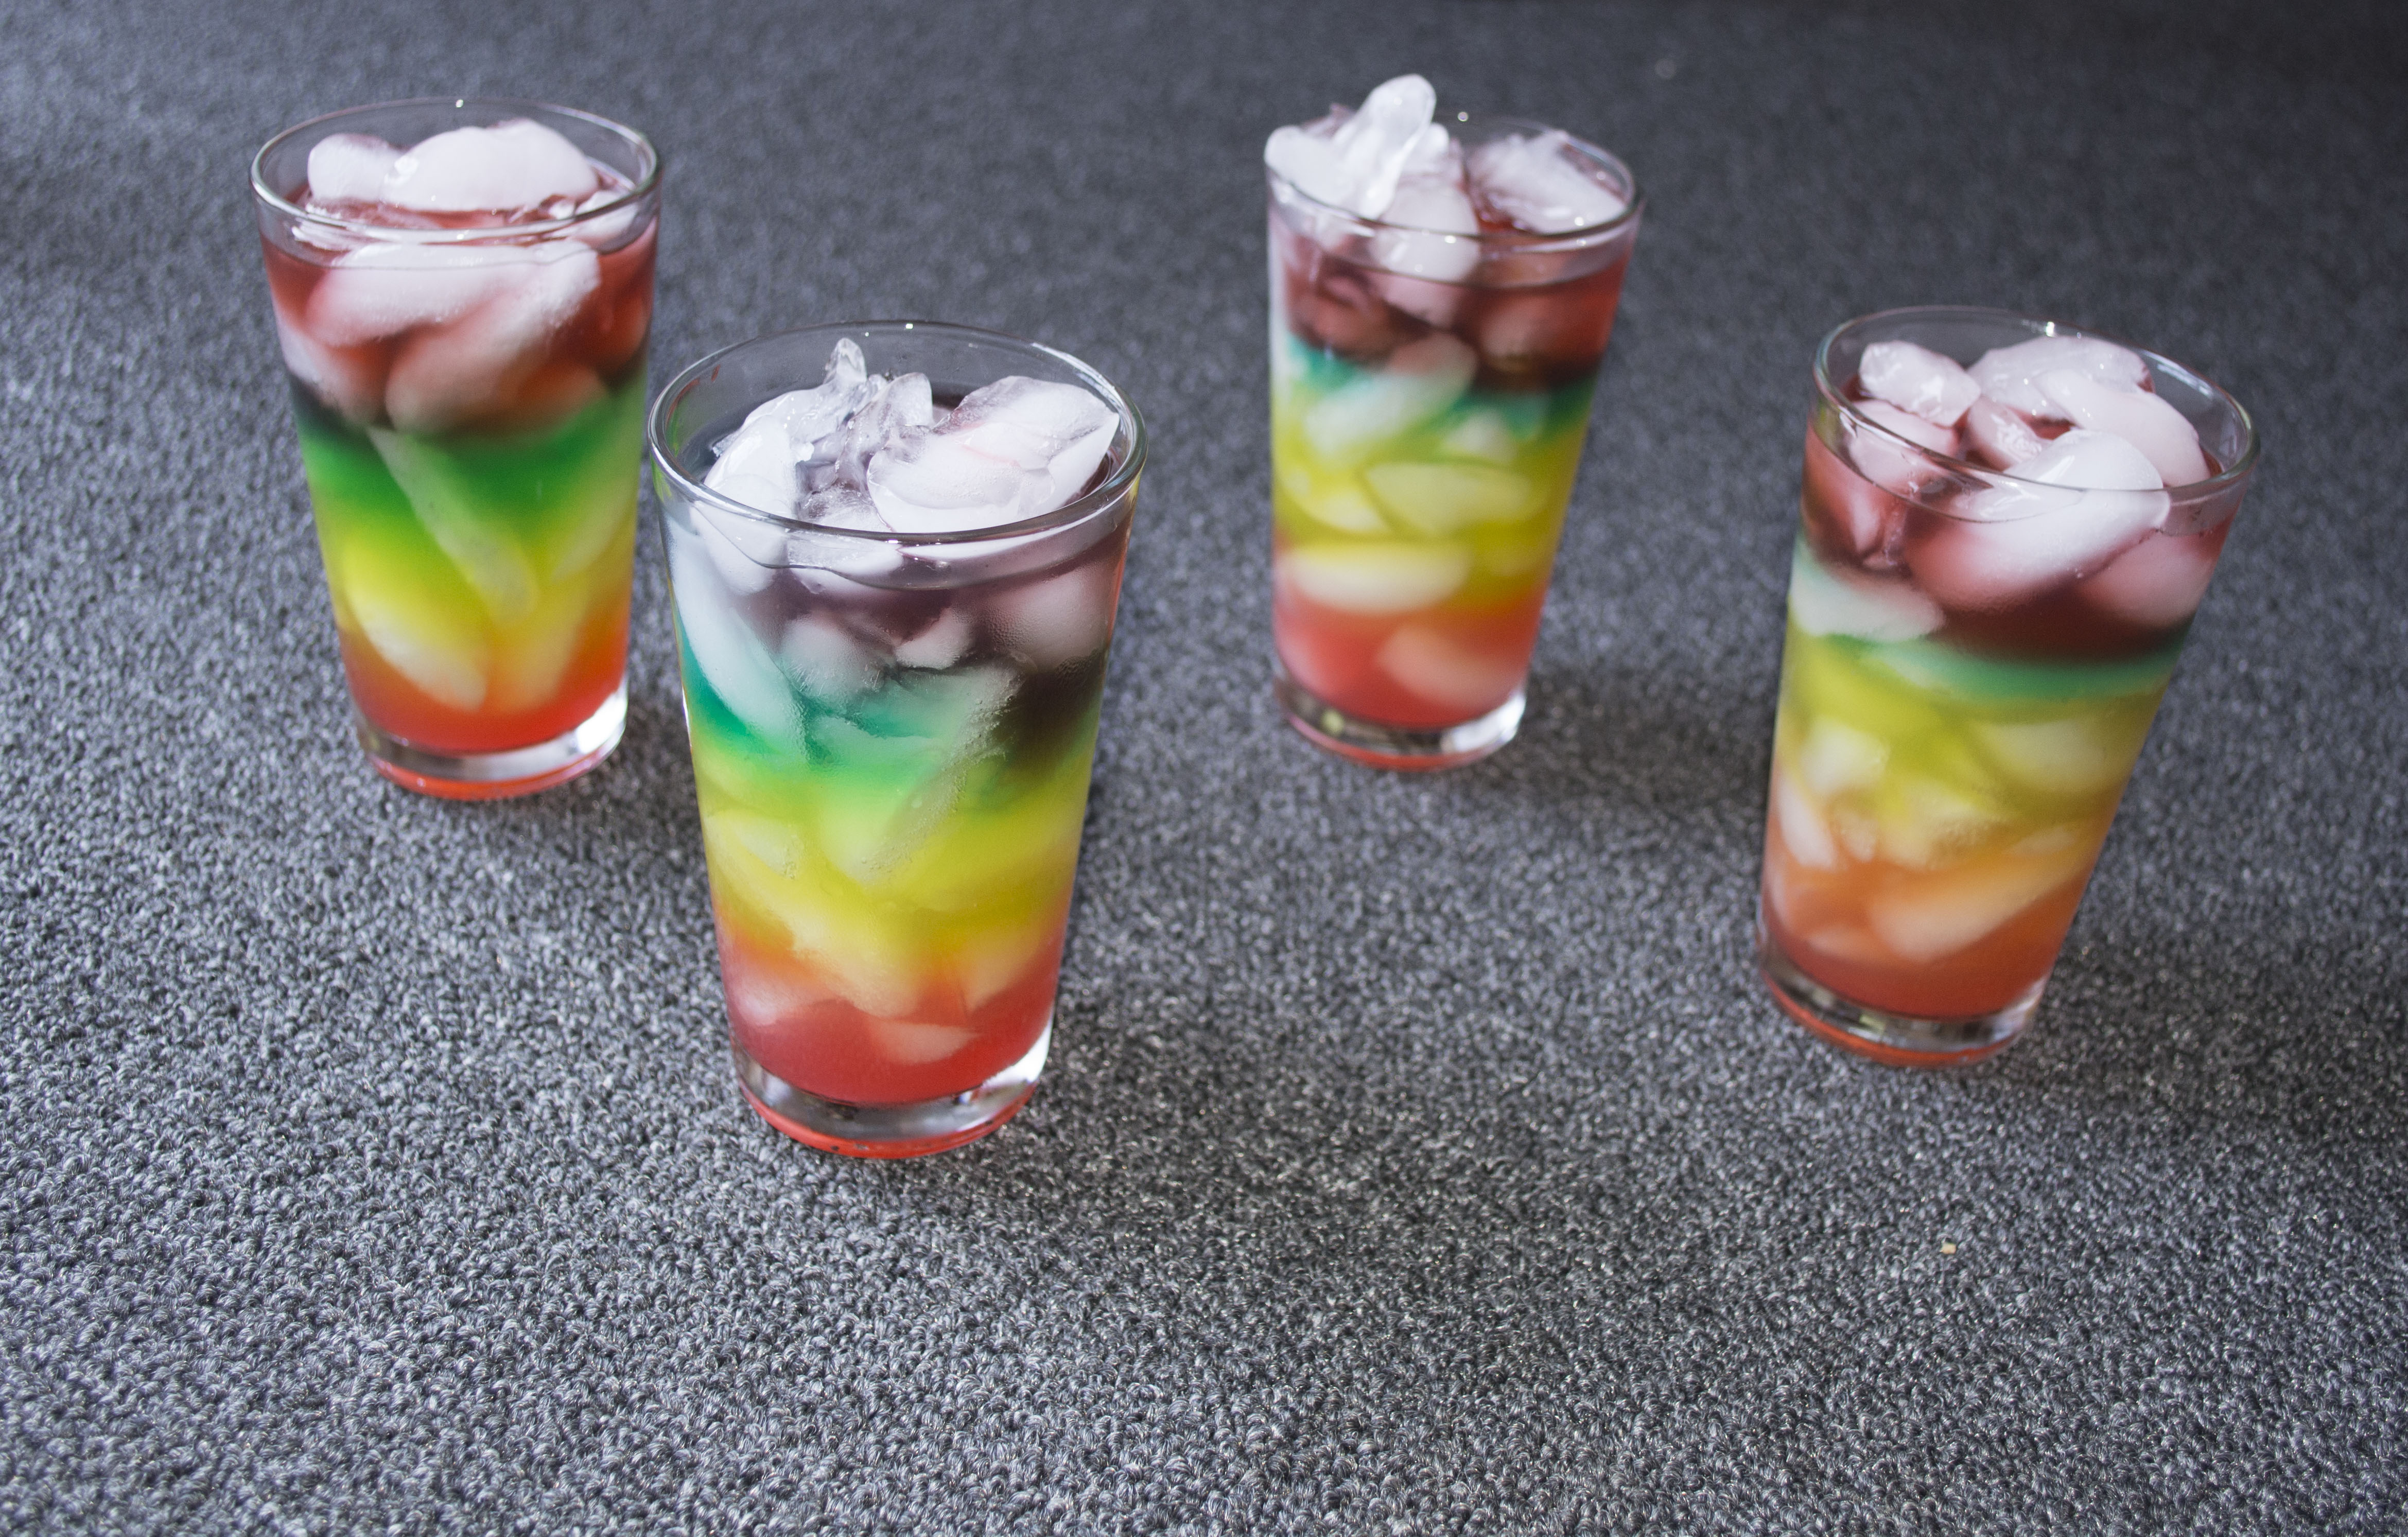
Not just any layered drinks, of course. In our layered lemonade, the intensity of flavors as you go down the layers increases exponentially. The sugar and lemon juice proportions for the same quantity of liquid increase according to the Fibonacci sequence. The sweeter layers are denser and naturally keep separated lower down. Indeed, the nature of layered drinks is that they are monotonically increasing in sweetness (and/or decreasing in alcohol). Thus, there is an intrinsic mathematical property to all layered drinks.

Additionally, the ratio of sugar to lemon juice in our lemonade isn’t constant. The top layer of our drink is 1 part lemon, while the second layer is 1 part sugar syrup. Following the Fibonacci rule, each subsequent layer has proportions that are the sum of the previous two layers proportions.

Layer 3 is 1 part lemon, 1 part sugar. Layer 4 is 1 part lemon, 2 parts sugar, and so on.

Generically, for layer n > 2, there are fib(n-1) parts sugar and fib(n-2) parts lemon juice. These are adjacent Fibonacci numbers, so as the drink is consumed the ratio of lemon to sugar approximates the Golden Ratio. This drink may be the worlds first tastable example of the relationship between the Fibonacci sequence and the golden ratio!

Surprisingly, using golden ratio relative proportions of lemon juice and simple syrup actually seems to make rather good lemonade. When consumed, the beverage starts out fairly flavorless, then rapidly ramps up. It also alternates between being a bit sweet to being slightly sour (of course this is a matter of personal taste), as the approximation of the golden ratio alternates between being slightly high and slightly low.

You too can make Fibonacci lemonade and experience the taste of exponential flavor, the golden ratio, and the Fibonacci sequence. Just follow the recipe below!

fibDrinkIce2

Ingredients and Materials:

Lemon Juice
SImple Syrup (1 cup sugar dissolved in 1 cup water)
Water
Food Coloring (optional but makes it pretty)
Ice or a spoon for slow pouring (the ice free strategy is much harder)

The Method

You must start with the sweetest and densest layer and work your way backwards up the drink. I describe the layers for a 7 layer drink below, although you may choose to make a different number of layers to start. The drink could also be made without the first layer, in which case it is neatly just two offset increasing Fibonacci sequences, one per ingredient.

First, fill your glasses with ice. Then, do the following steps for each layer. Finally, sip your mathematical masterpiece.

  1. Add the proportions of lemon juice and simple syrup indicated below to your liquid measuring cup.
  2. Add food coloring if desired.
  3. Fill measuring cup to the 4 oz. (1/2 cup) line.
  4. Stir to blend all ingredients in your measuring cup.
  5. Slowly pour a layer from your measuring cup into your drink glasses. You want to pour directly onto an ice cube, the ice cubes are there to slow down your liquid as it goes down the cup and to help keep the layers distinct. (You can pour the first layer normally)

The Layers

  1. 1 tsp. lemon juice
  2. 1 tsp. simple syrup
  3. 1 tsp. lemon juice, 1 tsp. simple syrup
  4. 1 tsp. lemon juice, 2 tsp. simple syrup
  5. 2 tsp. lemon juice, 3 tsp. simple syrup
  6. 3 tsp. lemon juice, 5 tsp. simple syrup
  7. 5 tsp. lemon juice, 8 tsp. simple syrup

Tips

  • Many simple syrups are 2 parts sugar to 1 part water. If yours is like this, halve the amount of sugar you are using (or it will probably be far too sweet).
  • For a more authentic, less watered down experience, you need to make your drinks without ice. This is much harder, and I don’t actually recommend it unless you are patient or really know what you are doing. You can find directions for layering without ice here


Non-Euclidean Chess – Part 2

Seeing as it has taken me quite some time to post this, you’re probably all tired of playing on Chess on the non-Euclidean boards that I described previously. Which means that it’s time to explore Roice Nelson’s idea of hyperbolic chess.

First, lets talk a little about 2D hyberbolic tilings for those who haven’t encountered them in the past. On a Euclidean plane, we can tile squares onto a checkerboard such that four corners meet at a point.

chess
A boring Euclidean chess board is a tiling of squares where 4 squares meet at each point.

On a hyperbolic checkerboard more than 4 regular quadrilaterals meet at a vertex when tiling a plane. This means each angle of a square must be less than 90 degrees (if 5 squares meet at a vertex in a planar tiling, then the angles should be 360/5 or 72 degrees).

There are lots of potential regular hyperbolic tilings that we could imagine playing chess on. We’d like to preserve the checkerboard property of our tiling, so we will only consider tilings where an even number of regular polygons meet at a vertex. Here are a few potential tiling candidates drawn using the Poincaré disk model*.

The {4,6} hyperbolic tiling is a tiling of 4-sided polygons (squares) such that 6 of them meet at a vertex. It’s nice because it keeps the shape of the tiles in the checkerboard as squares.

4-6-hyperbolic-checkerboard
{4, 6} Regular Hyperbolic Checkerboard

A {5, 4} tiling where 4 pentagons meet at a vertex maintains the property that a piece moving along the diagonal can only visit tiles of one of the two colors. On the other hand, it becomes extremely difficult to define the opposite side from a side or the opposite corner from a corner, so moving in a straight line quickly gets messy.

5-4-hyperbolic-checkerboard
{5, 4} Regular Hyperbolic Checkerboard

Finally, the {6, 4} and {4, 8} tilings start to get pretty busy, but do nicely maintain the idea of having opposite edges well-defined (lacking in a pentagonal tiling), while keeping opposite corners colored the same.

4-8-hyperbolic-checkerboard 6-4-hyperbolic-checkerboard

The first issue that we face with our hyperbolic chess board is that it isn’t going to lie flat in 2D Euclidean space, so pieces are going to want to slide off (thanks, gravity!). Thus, playing hyperbolic chess with a physical board requires either that our pieces actually stick to our board (velcro?), that we put up with the large amount of square distortion that occurs when trying to embed a hyperbolic board on a Euclidean plane, or that we write and play our game on a computer.

Looking at the tiling candidates above, the {4, 6} tiling and other square tilings seem like clear winners for our hyperbolic chess game. In particular, it is immediately obvious what it means to travel horizontally and vertically across it.

Examples of rook (blue) and knight (green) moves


The main question is what it means to travel diagonally across the tiling, when leaving a corner of the {4,6} tiling there is one obviously diagonal square, and two still kind of diagonal squares adjacent to it. However, the obviously diagonal square doesn’t share a color with the original square, which means that we lose one of the standard rules of chess – that each bishop can only visit a single color of square. It also more or less ruins the game of checkers, in my opinion. Moreover, if we only allow the “obvious” diagonal, then a bishop would be unable to reach a majority of the squares in the tiling. Therefore, I instead define a ‘reasonable diagonal’ to a square, A, as any square, B, that shares a vertex and a color to A.

For checkers it seems reasonable to allow going to either of them at every diagonal. This seems to be in keeping with the spirit of the game and to be likely to keep game play reasonably balanced.

It’s less clear that this is a good strategy for chess. It certainly makes the pieces that can travel along diagonals much more powerful, as they can now travel to many more squares than ones that can only travel horizontally or vertically. That said, my guess is that a reasonable strategy would be for pieces moving along the diagonal to be able to make a choice when moving out the very first corner to either take the “right” or “left” path and to always take that path on any given move. Thanks to the negative curvature of the board and the straight lines we are requiring, this does leave an interestingly large space that it would take any given piece multiple turns to reach.

An example of a diagonal "bishop" move
An example of a diagonal “bishop” move

Another question is how big to make the surface and where to position the pieces at the start of the game.

Since the horizontal and vertical distances are pretty well defined, we can use them to define the size of the board and the location of the pieces. We start by placing the White queen on a white square. Place a white pawn in a vertically adjacent square. place the remainder of the white pawns such that they are in the same horizontal line as the white pawn you have just placed (with the same number on each side as in chess, of course). Place the remainder of the white pieces such that they are placed correctly as in chess and in the same horizontal line as the white queen. Define one edge of the board as directly behind these pieces.

From the white queen count 7 more squares vertically in the direction of the white pawns, and place the black queen there. Following similar rules to the above, place the remainder of the black pieces and define another edge of the board.

It would be nice to define sides to our board. Unfortunately, this is necessarily not as nice or easy to do as the front and back the way that we have defined the rest of the board. In chess, sides are most important for queening, which only requires the back edge, and for cornering the pieces (ie. the King during endgame). This means that defining sides isn’t strictly necessary, but we could possibly define them anyways by starting from the corner piece and constantly turning towards the center of the board to define side edges.

Pentagons are my favorite polygon, so I’m pretty fond of the {5, 4} tiling. If chess had originally been developed on a board like this, we might imagine that the standard move might involve entering a square on a face and leaving at the opposite vertex or vice versa. Perhaps rooks would have to start their move going across an edge, bishops would have to start going across a vertex, and queens could do either. Knights have the natural travel rule of having to go through an edge, then through one of the two far edges. I love the elegance and naturalness of these rules for the tiling. One might almost imagine that chess was invented for this tiling and that our Euclidean version came out of an attempt to modify the rules to fit a Euclidean chess board.

Examples of moves that a rook (blue arrows) or a knight (pink arrows) could make on this board

I hope you’ve enjoyed our adventures through non-Euclidean chess. It’s interesting to realize how much the apparently** Euclidean nature of our world influences the games that we play and the rules that we make for them. Rules that are straightforward in Euclidean geometry become bizarre, insufficiently well-defined or otherwise sub-optimal in other geometries and vice-versa.

* Hyperbolic tilings were created with the aid of KaleidoTile
** According to general relativity, space is curved, but we don’t notice it so much at our scale

Introducing the Tip Palindromator

It’s surprising to me how many people I know have independently taken to tipping such that the total is palindromic. The reasons for doing so are simple enough:

  1. It’s entertaining (for you and for the staff processing your charge)
  2. It helps you quickly verify credit card charges and check for potential fraudulence
  3. After a delicious sleepy meal late at night, one definitely needs to practice one’s mental math abilities…

Ok. We should probably strike #3.

  1. After a delicious sleepy meal late at night, one definitely needs to practice one’s mental math abilities…

The fact is we’ve all gotten checks where we definitely did not want to have to deal with figuring out precisely how much to tip. After one too many of those, I realized that I needed to create the Tip Palindromator (http://octahedralgroup.org/tip).

Pasted_Image_5_6_14__2_22_PM

The Tip Palindromator shows up great on mobile web. Want it as an application? Just choose the “add to home screen” option from your Android or iPhone web browser. The “Tip It” application is a great addition to the home screen.

It lets you quickly input your total bill and automatically finds a potential palindromic tip*, which can be adjusted up and down to find the perfect tip percentage.

Now, even the half-asleep can leave palindromic tips with ease.

* Note: I use this term to refer to a tip that leaves a total that is a palindrome, rather than a tip that is itself a palindrome.

Six Card Ball

My gift for Gathering For Gardner 11 was a set of pre-cut playing cards that can be used to assemble a cute geometric construction. The final construction looks like this:

6 Card Ball

It’s a fun design where the interior figure is clearly a dodecahedron, but, since each card represents two faces of the dodecahedron, the symmetry group represented is pyritohedral.

Here is a template that you can print out and cut up to make your own set of cards for this construction.

6-card-ball-template

Your slotted cards should look like this:

Vnumx

You will need six of them to create your ball. Each card should be folded in half “hamburger-style”.

VHn65

You can join two cards, slotting the two short cuts on one side of one card into two adjacent long cuts on another. All the cards slot into all of the other cards in this same way.

ZjrBj 9RFUy

Adding a third card starts to get tricky. The three cards slot together to form a three way join. This is pretty difficult to explain, but here are a bunch of pictures. Don’t worry! Once you have one three-way corner done, the rest are put together the same. By the time you finish, you’ll be a pro!


Now is a great time to take a peek at the inside of your ball before you start closing it up. Can you see the dodecahedron forming?

mWZA0

The rest of this model pretty much follows from the steps previously described. Keep adding pieces like above until your ball is complete! Here are some pictures of the finished ball from different angles.


Gathering for Gardner 11

Today marks the beginning of Mathematics Awareness Month, and this year’s theme is Martin Gardner. Coincidentally, I recently returned from my second trip to the Gathering 4 Gardner (G4G), a recreational math conference with a focus on the sorts of things that Martin Gardner wrote about in is Scientific American column, such as puzzles, magic, mathematical art and other recreational mathematics.
Pretty much everyone who attends is really neat and has done something really cool that was directly or indirectly inspired by Martin Gardner. A number of the attendees are actually professional magicians and one highlight of the event is the astounding evening events and shows.
In addition to organized talks, the highlight of the conference is often just talking to people. I know quite a lot about polyhedra, but I had an interesting discussion with John Conway (who also had the honor of being the theme for this year’s conference) about the naming of the rhombicuboctahedron where I learned some new things that I hadn’t known previously.
My favorite part of G4G is an afternoon excursion devoted to talking and learning things from other attendees, and also to large art sculpture “barn-raisings”. I was one of the six artists that participated in the sculpture event and organized a group to make a construction out of hair bands, a fun precursor to my later talk on a hair tie 120-cell (a 120-cell is a regular 4-dimensional polychoron made out of 120 dodecahedral cells). My creation used a technique for making large geometric constructions out of hair ties that I learned from Zachary Abel at the last G4G.
Here’s a picture of some the team that helped me construct the hair tie construction. Thanks to everyone that helped!
DSC_9392
The hair band construction consists of a tetrahedron of green hair bands inside a cube of purple bands, inside an octahedron of black bands. You can see the tetrahedron in the cube fairly well in this close up shot.
DSC_9386

G4G has a formal puzzle and art exchange as well as many informal ones. Here are a few of the neat things that I got from G4G11. If you were in doubt about my claim that the people that attend G4G are collectively really cool and amazing, these pictures should probably lay your doubts to rest.

George Hart’s gift exchange item was a set of pre-cut cards that assemble into a Tunnel Cube.DSC_9420
Edmund Harriss laser cut sets of paper pieces that cleverly slotted together. I took two chiral sets of five-pronged pieces and combined them to make this neat woven ball.
DSC_9422
Eve Torrence gave me a set of pieces for her gorgeous “Small Ball of Fire”. I love the choice of foam as the material, as it is very forgiving and easy to assemble.
DSC_9424

I got this surprisingly fun and meditative marble labyrinth from Bob Bosch.

DSC_9423
And two different versions of a square to equilateral triangle dissection. The hinged one was 3d printed by Laura Taalman. The wooden piece is from Dick Esterle
DSC_9427

Finally, the gift exchange includes many fun puzzles and papers that are interesting, but not as photogenic. I particularly liked the “turn MI into MU” (solvable variant) puzzle from Henry Strickland.

In my next post, I will talk about my own G4G exchange gift, that you can construct at home even if you didn’t attend G4G!